11 Steps to Start and Manage a Facebook Business Account

11 Steps to Start and Manage a Facebook Business Account
58% of small businesses want to increase their investment in Facebook. Here are 11 easy steps for creating and optimizing your Facebook business account.
One-third of the world’s population – 2.07 billion people to be exact – use Facebook daily. For small businesses, this presents a significant opportunity to reach and connect with your target audience.
It’s no surprise then that 58% of surveyed small businesses want to increase their investment in Facebook.

A business account on Facebook is the best way to find and engage your customers on the most popular of social media platforms.
So where to begin? How can you set up a Facebook Page for your business?
Here are 11 steps to creating and optimizing a Facebook Page for your small business.
- Create your page
- Add images
- Add a page description
- Create a username
- Fill out the About section
- Add collaborators
- Create a Facebook post
- Add a Pinned Post
- Invite friends
- Install the Facebook Page Plugin
- Add a call to action
1. Create Your Page
It’s easy to open a Facebook Business account.
To start, go to https://www.facebook.com/pages/create.php.
Click “Get Started” under the “Business or Brand” tab on the left.
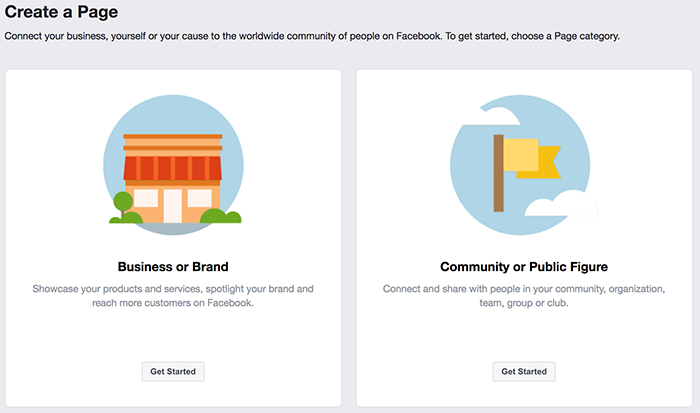
The next screen will ask for the name of your business, your address, and other basic contact information.
Once you add a subcategory for your business, you’re done and ready to customize your new Facebook business page.
2. Add Images
Pictures are essential to creating a strong first impression.
Use your profile and cover pictures to capture the essence of your product or service and help visitors identify your business.
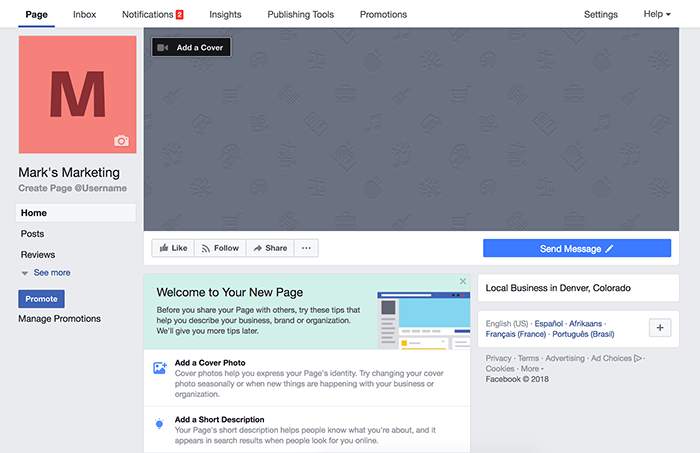
To add a profile picture, click the camera icon in the profile picture box in the upper-left portion of the page.
The scroll-down menu gives you the option to “Upload” a photo, use a Facebook photo, or take a new photo.
Your profile picture will be visible to people as they search for and engage with your business on Facebook.
If your brand logo is widely recognized, use it here. However, most small businesses benefit from placing a photo of their product or service to instantly communicate their value to visitors.
Next, click the “Add a Cover” icon in the grey cover in the top-left of the cover photo box.
You’ll see the same image upload options as before, or you can choose to upload a video. Click “Upload a Cover” when finished.
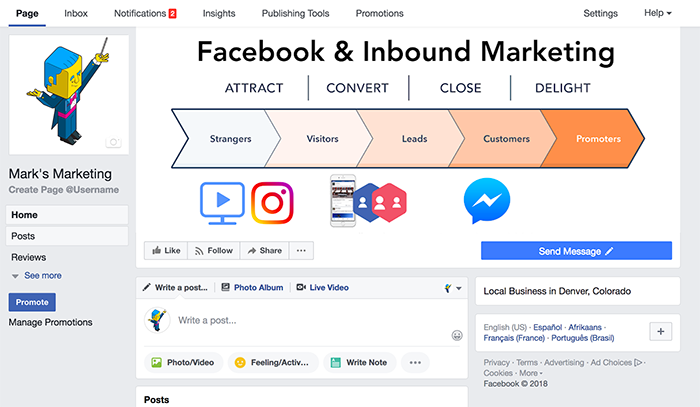
As our Mark’s Marketing page shows, the cover image should communicate the core of your brand and excite people to discover more.
3. Add a Page Description
You want to let visitors know about your business. Use a couple sentences (at most) to outline your product or service and who it’s for.
To add a page description, click “Add a Short Description” underneath the green welcome bar.
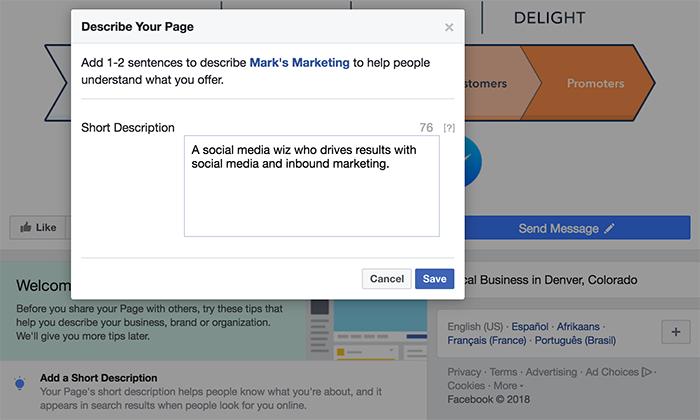
Create a concise but informative description that encapsulates your business offering.
Click “Save” when you’re finished.
4. Create a Username
Your username is a Facebook URL that tells people exactly where to find you online.
The memorable your username, the easier it will be for people to recall and return to your Facebook Business Page.
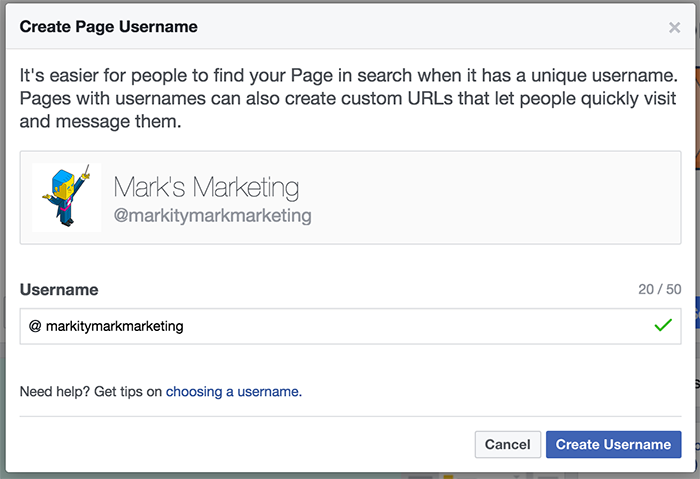
When finished, select “Create Username.” A box will appear that shows the link people can use to connect with your business directly.
5. Fill Out the About Section
The “About” section in your Page is a valuable source of information for visitors.
Provide information such as your hours of operation, your business location, and set expectations for people who contact you on Messenger.
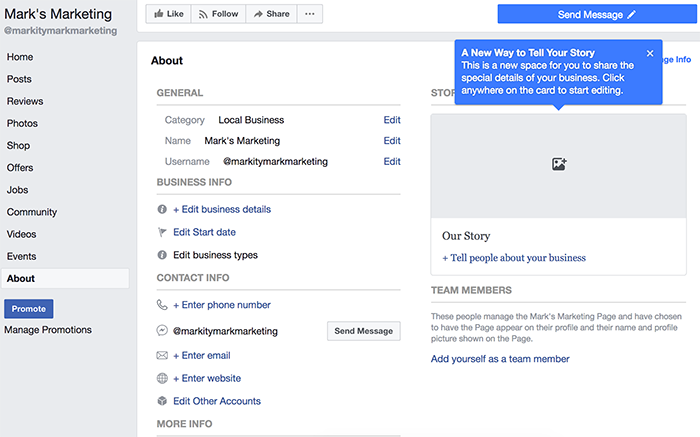
To begin, open the full navigation menu by clicking the arrow underneath your Facebook page name at left. Select the “About” tab at the bottom of the menu.
From here you can edit your hours of operation, website address, phone number, email, and more. Supply your customers the information they need to find and engage with you on every channel.
The “Our Story” area at right is an additional way to communicate what makes your brand unique. Upload a photo and write a short blurb to detail what makes your business outstanding.
To complete your page information, scroll up to the three-dot ellipsis icon located next to the “Share” button at the top of your feed.
Select the “Edit Page Info” tab to from the drop-down menu.
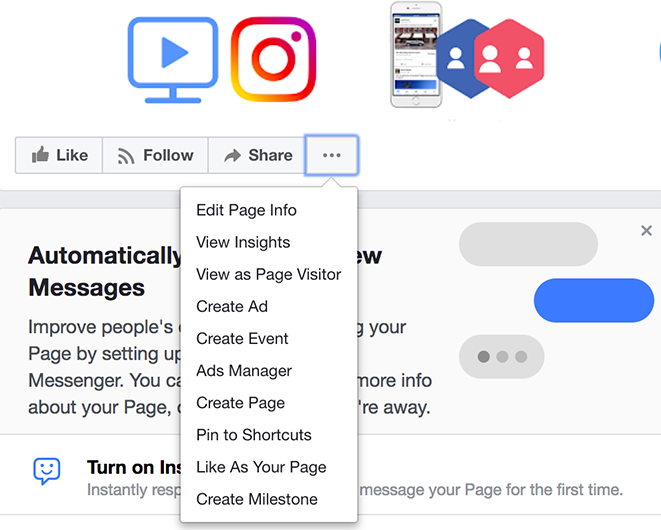
This section allows you to edit very specific portions of your business information.
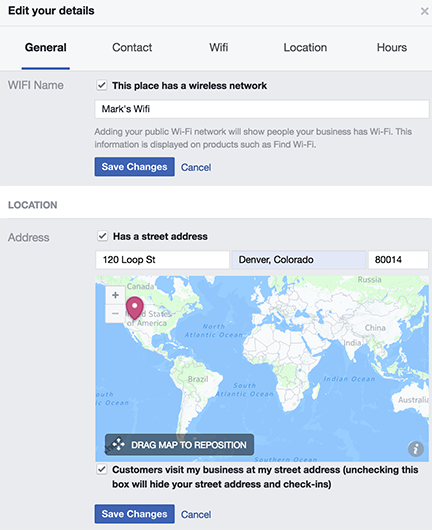
For example, you can pin your company on a Google map, detail your daily business hours, and even add WiFi access.
6. Add Collaborators
If you’re sharing your Facebook responsibilities with teammates, you’ll need to grant them access to different assets on your Facebook Business Page.
To assign roles, go to the “Settings” tab at the top right and choose “Page Roles” from the menu at left.
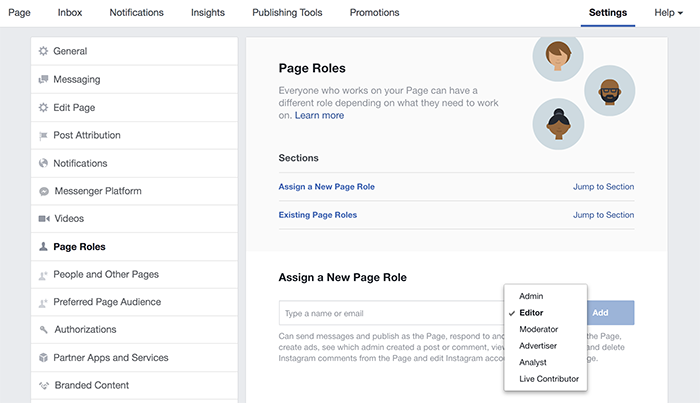
Under “Assign New Roles,” you can grant access to various areas by title:
- Admin: Holds access to everything on the Facebook page (you are the admin by default).
- Editor: Maintains and updates the page in all ways, such as creating ads, viewing Insights, messaging, posting content, viewing the actions of other admins, and more.
- Moderator: Edits the page by curating content, posting ads, sending messages, viewing who created a post, and accessing insights.
- Advertiser: Creates ads, views insights and sees which person performed which action.
- Analyst: Views insights and posts to the page.
7. Create a Facebook Post
It’s best to post valuable content before inviting people to your Facebook Page.
Whether it’s a status update, a blog post, or curated content – these posts are critical to enticing your audience to engage with your brand.
If your Facebook business page lacks content, people will bounce in search of more interesting fare.
To create your first post, touch your cursor to the text box at the top of your Facebook page. You can begin writing immediately, or select from the various option below.
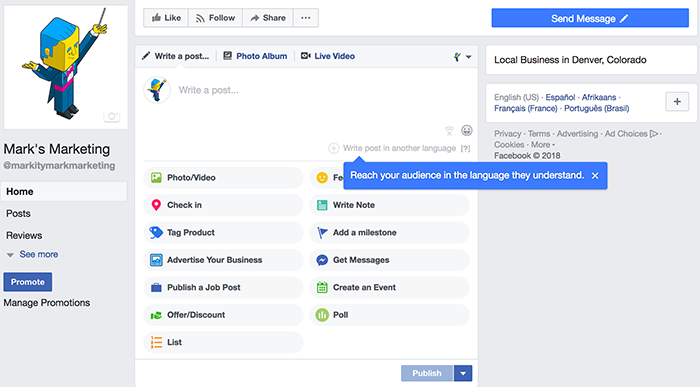
Whether you upload a brand video that shares your story, add a company milestone, or create an event – click “Publish” and your post will be live.
Visual content is king on Facebook.
A study from Buzzsumo found that visual posts on Facebook receive 2.3x the engagement of posts without images. A blend of relevant imagery and text is the best way to capture your visitor’s attention and kickstart a brand relationship.
8. Add a Pinned Post
A Pinned Post sits beneath the cover image and above the feed on your Facebook Page.
Since it’s front and center, it can’t be overlooked and every visitor will see it. The prominence of a Pinned Post allows you to enhance the visibility of your most important marketing messages.
For example, this could be a promotion, an ebook download, or news about your product or service. Aligning the content of your Pinned Post to your business objectives will help you drive results.
To create a Pinned Post, publish a regular post. Then click the three dots at the top right of the post and select “Pin to Top of Page.”
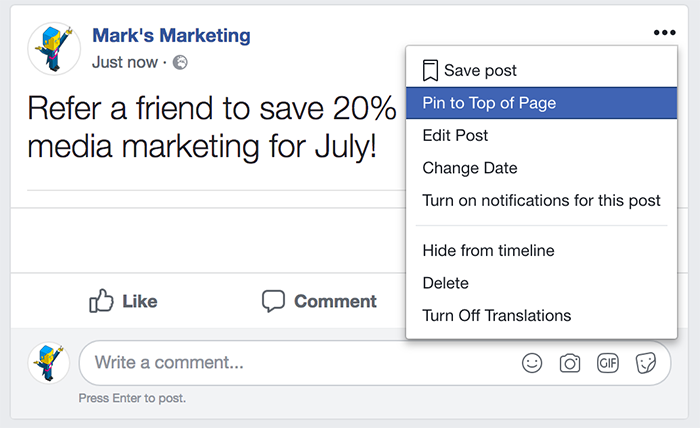
Your Pinned Post will now appear as the first post to all users.
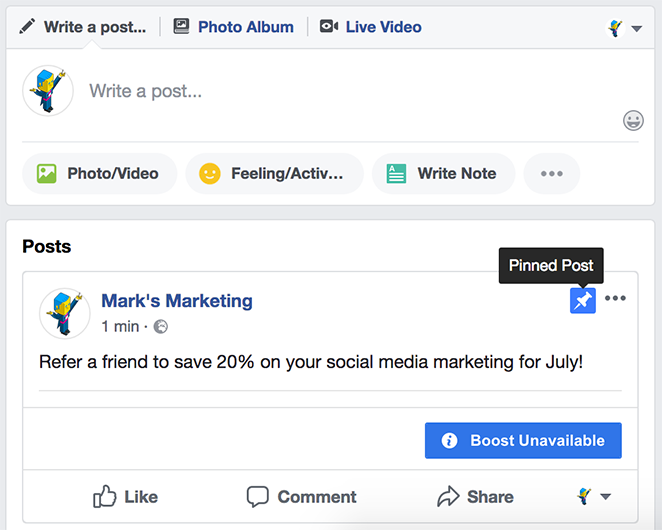
You can un-pin the post by clicking the three dots again and selecting accordingly.
9. Invite Friends
Once you’ve published a handful of posts, you’re ready to grow your following.
From within the left-side navigation menus, scroll down and click the “Community” tab. In the right column, find the “Invite Friends” tab.
You can either enter friends names by hand or click-through each name in the thumbnail menu below.
Once you hit “Invite,” everyone whose name appears at the left side of the Invite menu will receive a message to Like your page.
10. Install the Facebook Page Plugin
The Facebook Page Plugin lets you embed and promote your Facebook business page on your website. This means website visitors can like and share the page without leaving your website.

Installing the plugin will help you generate visibility for your social presence and improve your Facebook traffic.
Visit the Facebook Developers website and enter the requested information. Once you click “Get Code,” copy and paste the first code snippet into your web theme’s header.
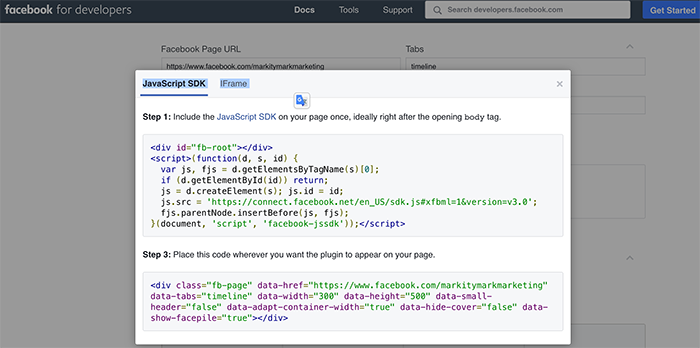
Next, copy the second snippet of code and paste it into the appearance section of your website.
Be sure to create a text widget first and past the copied snippet here. This will allow you to adjust the width and height of the plugin on your site as needed.
11. Add a Call to Action
Including a call to action (CTA) on your Facebook Page lets you drive results with visitors.
People use Facebook for many reasons, but this allows you to draw attention to the solution your business provides to its target audience.
By default, the CTA button appears as the “Send message” button at top right of your page.
To edit this button, hover the cursor over the button and scroll down to the Edit Button tab. A screen will appear, then select the CTA button you want.
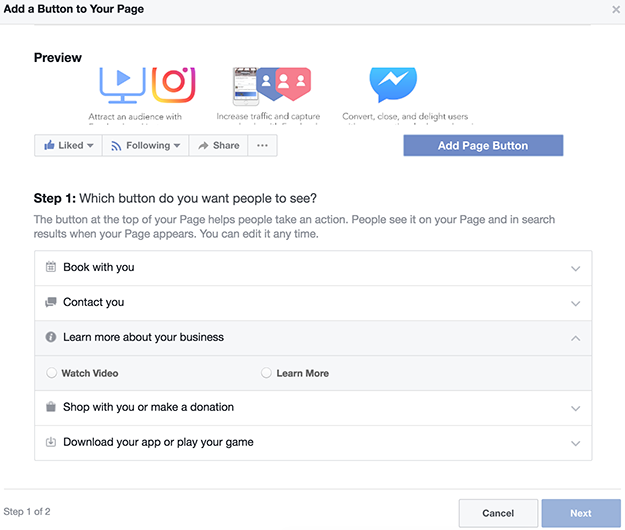
You can show visitors a video, have them call you, or download your app. For best results, align your CTA with something visitors will find valuable after visiting your page.
Learn how to increase your Facebook engagement in 2018.
Start Your Facebook Business Account
A Facebook business page is the doorway into social media marketing.
Expanding your business onto Facebook will allow you to reach a wider and more engaged audience than ever before.
