A Step-by-Step Guide to Selling an App on Google Play

A Step-by-Step Guide to Selling an App on Google Play
Excited about launching your first app? Learn more about selling your app on Google Play. Follow these steps to get your Android app published.
Updated March 13, 2023
Last year, Google Play users installed apps 82 billion times, making Google Play one of the largest platforms for distributing, promoting, and selling apps.
For newbies and first-timers, publishing an app on Google Play can seem like an intimidating process — especially since 55% of apps that are submitted for publishing on Google Playare rejected. Like any other app store, the platform comes with its own set of rules, regulations, and procedures, and you need to understand how it works in order to avoid any future issues.
This article is a step-by-step guide on how to successfully publish your app on the Google Play Store.
- Create a developer account
- Link your merchant account
- Add your Android app
- Prepare store listing
- Upload APK to an app release
- Provide an appropriate content rating
- Set up pricing & distribution
- Publish your app
Looking for an app developer? Search for top app development companies on The Manifest.
Step 1: Create a Developer Account
Before you can publish any app on Google Play, you need to create a Developer Account. You can easily sign up for one using your existing Google Account.
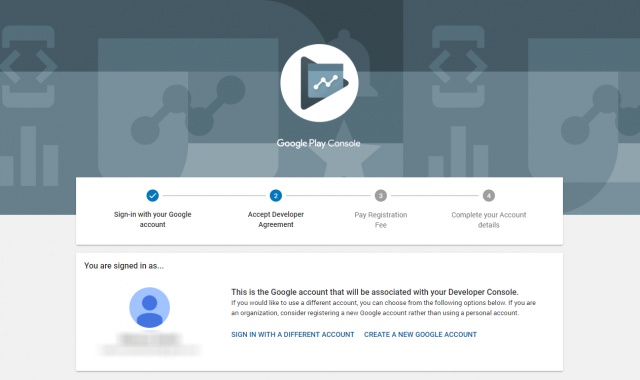
The sign up process is fairly straightforward, and you’ll need to pay a one-time registration fee of $25. After you’ve reviewed and accepted the Developer Distribution Agreement, you can proceed to make the payment using your credit or debit card.
To finish the sign up process, fill out all your necessary account details, including your Developer Name, which will be visible to your customers on Google Play. You can always add more details later.
Also, do remember that it can take up to 48 hours for your registration to be fully processed.
Step 2: Plan to Sell? Link Your Merchant Account
If you want to publish a paid app or plan to sell in-app purchases, you need to create a payments center profile, i.e. a merchant account. Here’s how you can do that:
- Sign in to your Play Console
- Click on Download Reports – Financial
- Select ‘Set up a merchant account now’
- Fill out your business information
Once you create the profile, it will be automatically linked to your developer account.
A merchant account will let you you manage your app sales and monthly payouts, as well as analyze your sales reports right in your Play Console.
Step 3: Add Your Android App
Now that you have set up your Play Console, you can finally add your app. Here’s how to do that:
- Navigate to the ‘All applications’ tab in the menu
- Click on 'Create Application'
- Select your app’s default language from the drop-down menu
- Type in a title for your app
- Click on “Create”
The title of your app will show on Google Play after you’ve published. Don’t worry too much about it at this stage; you can always change the name later.
After you’ve created your app, you’ll be taken to the store entry page. Here, you will need to fill out all the details for your app’s store listing.
Step 4: Prepare Store Listing
Before you can publish your app, you need to prepare its store listing. These are all the details that will show up to customers on your app’s listing on Google Play.
Note: You don’t necessarily have to complete this step before moving on to the next one. You can always save a draft and revisit it later when you’re ready to publish.
The information required for your store listing is divided into several categories:
Product Details
There are three fields here that you need to fill out:
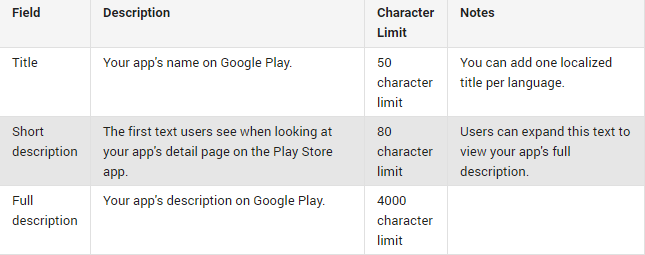
Your app’s title and description should be written with a great user experience in mind.
Use the right keywords, but don’t overdo it. Make sure your app doesn’t come across as spam-y or promotional, or it will risk getting suspended on the Play Store.
Graphic Assets
Under graphic assets, you can add screenshots, images, videos, promotional graphics, and icons that showcase your app’s features and functionality.
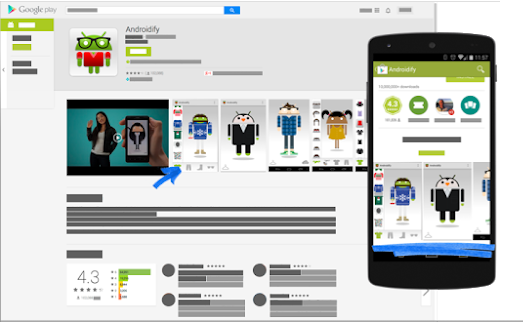
Some parts under graphic assets are mandatory, like screenshots, a feature graphic, and a high resolution icon. Others are optional, but you can add them to make your app look more attractive to users.
There are specific requirements for each graphic asset that you upload, such as the file format and dimensions. You can read more about each requirement here.
Languages & Translations
You can also add translations of your app’s information in the store listing details, along with in-language screenshots and other localized images.

There’s also an option for users to view automated translations of your app’s information using Google
Translate (with the exception of Armenian, Raeto-romance, Tagalog, and Zulu), in case you don’t add your own translations.
Categorization
This part requires you to select the appropriate type and category your app belongs to. From the drop-down menu, you can pick either app or game for the application type.
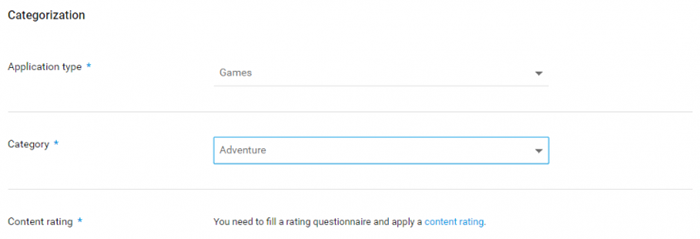
There are various categories for each type of app available on the Play Store. Pick the one your app fits into best.
In order to rate your content, you’ll need to upload an APK first. You can skip this step for later.
Contact Details
This part requires you to enter contact details to offer your customers access to support regarding your app.
You can add multiple contact channels here, like an email, website, and phone number, but providing a contact email is mandatory for publishing an app.
Privacy Policy
For apps that request access to sensitive user data or permissions, you need to enter a comprehensive privacy policy that effectively discloses how your app collects, uses, and shares that data.
You must add a URL linking to your privacy policy in your store listing and within your app. Make sure the link is active and relevant to your app.
You’re now done with the store listing. Go ahead and click on 'Save Draft' to save your details. You can always skip some steps and come back to them later before you publish your app.
Step 5: Upload APK to an App Release
Now that you have prepared the ground to finally upload your app, it’s time to dig out your APK file.
The Android Package Kit (or APK, for short) is the file format used by the Android operating system to distribute and install apps. Simply put, your APK file contains all the elements needed for your app to actually work on a device.
Google offers you multiple ways to upload and release your APK. Before you upload the file, however, you need to create an app release.
To create a release, select the app you created in Step 3. Then, from the menu on the left side, navigate to ‘Release management’ -> ‘App releases.’
Here, you need to select the type of release you want to upload your first app version to. You can choose between an internal test, a closed test, an open test, and a production release.
The first three releases allow you to test out your app among a select group of users before you make it go live for everyone to access.
This is a safer option because you can analyze the test results and optimize or fix your app accordingly if you need to before rolling it out to all users.
However, if you create a production release, your uploaded app version will become accessible to everyone in the countries you choose to distribute it in.
Once you’ve picked an option, click on ‘Create release.’
Next, follow the on-screen instructions to add your APK files, and name and describe your release.
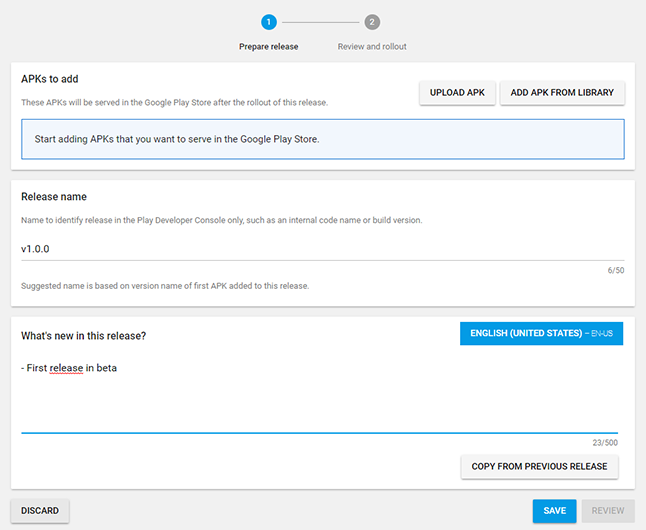
After you’re done, press Save.
Step 6: Provide an Appropriate Content Rating
If you don’t assign a rating to your app, it will be listed as ‘Unrated’. Apps that are ‘Unrated’ may get removed from Google Play.
To rate your app, you need to fill out a content rating questionnaire. You can access it when you select your app in the Play Console, and navigate to ‘Store presence’ – ‘Content rating’ on the left menu.
Make sure you enter accurate information. Misrepresentation of your app’s content can lead to suspension or removal from the Play Store.
An appropriate content rating will also help you get to the right audience, which will eventually improve your engagement rates.
Step 7: Set Up Pricing & Distribution
Before you can fill out the details required in this step, you need to determine your app’s monetization strategy.
Once you know how your app is going to make money, you can go ahead and set up your app as free or paid.
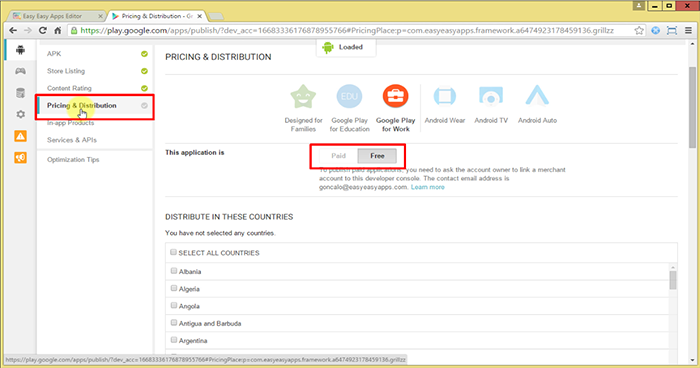
Remember, you can always change your app from paid to free later, but you cannot change a free app to paid.
For that, you’ll need to create a new app and set its price.
You can also choose the countries you wish to distribute your app in, and opt-in to distribute to specific Android devices and programs too.
Step 8: Rollout Release to Publish Your App
You’re almost done. The final step involves reviewing and rolling out your release after making sure you’ve taken care of everything else.
Before you review and rollout your release, make sure the store listing, content rating, and pricing and distribution sections of your app each have a green check mark next to them.
Once you’re sure you’ve filled out those details, select your app and navigate to ‘Release management’ – ‘App releases.’ Press ‘Edit release’ next to your desired release, and review it.
Next, click on ‘Review’ to be taken to the ‘Review and rollout release’ screen. Here, you can see if there are any issues or warnings you might have missed out on.
Finally, select ‘Confirm rollout.’ This will also publish your app to all users in your target countries on Google Play.
Going Forward, Maintain Your App In The Google Play Store
If you follow all the steps above correctly, you’re all set to successfully publish your app. But you can’t sit back and relax just yet. Your work has only just begun.
To make the most out of your new app, you need to promote it to make sure people know about it and find it interesting enough to download.
Also, make sure you invest in maintaining your app in the long-term. Keep on improving and updating it, and analyze its performance to turn it into an even better product for your customers.

